You can read the published version of this article at Gamasutra.com. It looks prettier, but you need to be registered to read it. Here is the original copy of the article, as I sent it to Gamasutra.
Making a new build of a game in development is a very stressful task. It requires great care and concentration for several hours, on work which is essentially tedious. Particularly towards the end of a project, the slightest mistake could be disastrous. Because of the demands of marketing, testing, management and the publisher, it is often carried out under high pressure.
Computers are particularly good at automating repetitive tasks, and carry them out more quickly and more reliably than humans can. Unfortunately, because this is often hard to do in Windows, people find it easier to carry on performing tasks manually using the GUI.
Welcome to the relaxing new world of automated build processes. You can make the process of turning your game assets into an actual CD image or Internet download as easy as compiling a new executable during debugging.
During development of Creatures 3, we used Unix scripting tools under Windows to write an automatic build process. It gathered all the work of the team, compiled, processed and tested it to produce a final CD image.
This was very successful. We are using the same system to similar advantage in current projects.
More reliable. The final builds were of a higher quality than manually made builds. This is because the build script never forgets to do something. In addition, automatic testing during the build process ensures the most obvious errors are caught before the build is finished.
Save developer time. Instead of having one engineer working full time to make a build, you only need someone to start the build going, and organise fixing of any errors that show up. That one engineer can then fix bugs, or do something else useful.
Risk reducing. If the developer who normally makes builds is ill, goes on holiday, or somewhere more disreputable, it is easier for other people to make builds. Even if there are problems, there is a clear script describing every stage of the process, so it is possible to work out what went wrong. The knowledge in the mind of the developer is captured in script code, rather than in his head.
Faster. If things went smoothly, we made a new build in half an hour. This isn't hugely faster than a smooth manual build with an attentive developer. However, the time taken is much more consistent. And the build can be made overnight, or while at lunch.
Instant availability for testing. The build process empowers your QA department by emailing them to let them know as soon as a new build is available. They can start testing it straight away, or have it waiting for them fresh off the cooker when they arrive earlier than you in the morning.
Despite all these improvements, making builds can still be stressful! The person responsible for builds still needs to check that everyone in the team is ready for the new build to be made. Then they set the build going, check for any errors and fix them or arrange for them to be fixed. They also need to maintain the build scripts.
So, what exactly does a build do to make this happen?
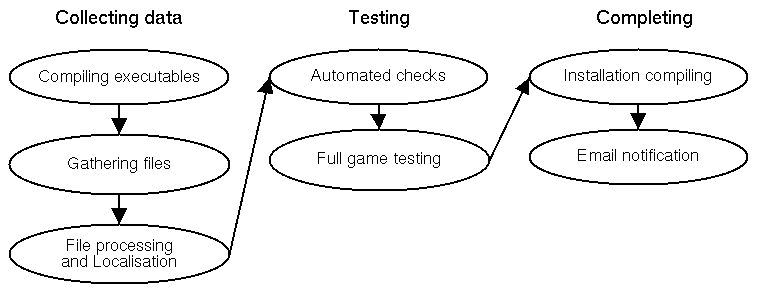
Here is a brief overview of the stages that you need in your build process. You can use this as an overall guide to writing your build script. The rest of the article gives lots of details for technical implementation.
Compiling executables. The first thing for a script to do is to grab any C/C++ source code from the version control system, and use a compiler to automatically make a release mode version of your game engine. In the process it can upgrade the version number and tag it in source control for future reference. Then you can always get the exact code back again for future debugging.
Gathering files. Next it is time to muster all the other assets. This means graphics, sounds, music, scripting code, level designs and video. These can be retrieved from your version control system or from a fixed place on the network. We do both, keeping many assets in a "build template" folder which is a skeletal version of the installed image.
Localisation. If your game is localised then you can customise the build, for example by copying the correct files depending on the language. You can also add or remove bundled adverts (e.g. an AOL installer) and change logos according to your publisher and market.
File processing. This is a good moment to carry out processing on the files. Graphics can be converted and optimised, and level files compiled. In Creatures 3 the build script ran our own tools to splice Norn genomes together, making the lives of our genetic engineers that bit easier.
Automated checks. As you get more used to build scripts, you will find it useful to add code to check for common errors. For example, scanning scripts to detect missing graphics files, or for common coding errors.
Full game testing. The next stage of the script is particularly crucial for increasing build quality. The build machine copies the game image as if it had been installed, and then launches it into a rolling demo or self-play mode. In Creatures 3 we hatched a few Norns and let them play in the world. The build script detects any error messages and if it finds them it abandons the build.
Installation compiling. Finally the build script calls the installation program (e.g. InstallShield) to create the installer from the game image, and copies the completed CD image to the network.
Email notification. The team members and QA are emailed to let them know it is ready. As a final flourish, you can even get the script to cut a physical CD and eject it from the drive!
Creatures 3's build process uses Unix tools running under Windows. These are free tools, licensed under the GPL, and ported to Windows by Cygnus (www.cygnus.com).
The main tool is the Bash (Born Again SHell), which is a popular Unix command line shell. It has a powerful scripting language, which provides all the logic conditions and loops that you need and much more. It calls the standard Unix commands for file copying and moving.
The second important tool is Perl, the famous "glue" language. You can easily do complex text file manipulation with Perl.
We used Unix tools for three key reasons. They've got a very rich feature set, like DOS on steroids. Once you know how to, you can do anything with them. Secondly, the skill is portable. We've used the same skills to administer Unix-based servers running game web sites, and they may help us to make best use of the PS2 development kits.
The third reason? They're free and open. We could play with them straight away without a purchase order.
There aren't any very strong alternatives to the Unix tools for scripting. The Windows command line is impotent, and commercial alternatives like 4DOS/TakeCommand/MKS gain you nothing for their price.
More recently, the Windows Scripting Host has got a lot better, and you might want to try it out. Find out more at http://msdn.microsoft.com/scripting/. You can do file copying using the FileSystemObject.
The machine that you run the build on is quite important. The Creatures 3 build process ran on a dedicated computer, which was of high specification at the time. This stops it interfering with the developer's main machine, and is also useful for soak tests, and other tests running in the debugger.
We now use Windows NT or 2000 for build machines. They are much more stable than Windows 95/98, particularly for running command line programs.
Note to editor: Should this section be an appendix or sidebar?
Since RedHat took over Cygnus, it has been quite hard to ferret a version of the Cygwin tools from their web site. Things look easier now, just go to http://sources.redhat.com/cygwin/ and follow the instructions.
Under Windows, the easiest way to install Perl is using ActiveState's distribution. Go to http://www.activestate.com/. This also installs a useful version of the Perl documentation which you can access from the Start menu.
The definitive sources of documentation are the somewhat dry online manuals. You can read some of them with the man command, or find them online.
There's a good Bash tutorial at http://www.beforever.com/bashtut.htm. It is for BeOS, but very little is platform specific. Make sure you also read the Cygwin User's Guide for the Windows specifics.
This is a good looking Perl tutorial http://www.netcat.co.uk/rob/perl/win32perltut.html. Perhaps a bit detailed for a build script, but useful if you need it!
Now I'll explain some of the harder technical details of writing your build script, and give some tips.
Most teams store at least some assets in a version control system, so it is essential for the build script to be able to retrieve data from them.
At Creature Labs we used Microsoft's SourceSafe for development of Creatures 3. Since then we have moved on to the excellent CVS. This was because it's more reliable, it's portable (I've transfered game web site code between Windows running IIS and Linux running Apache) and it's free.
If you know how to use CVS from the command line then you will find it very easy to call from your build process. SourceSafe is a little trickier. You have to set up some environment variables which aren't very well documented.
The following code is the set of environment variables that I use.
  echo -n Setting environment...
  export VSSDir="C:\\PROGRA~1\\Microsoft Visual Studio\\COMMON\\vss\\win32"
  export PATH="$VSSDir":"$PATH"
  export SSUSER=cbuilder
  export SSDIR="$SOURCE_SAFE_C2E/Database/"
  echo done
SSUSER is the user name in SourceSafe. We have a special user called "cbuilder" which is the build script. There's also a Windows network user with the same name. This way anyone can be taught to log into the build machine as "cbuilder", and network drive permissions won't cause trouble for the script.
With your environment set up, it is relatively easy to call SourceSafe. Have a look at the documentation, and these example commands.
ss Undocheckout $/Code/engine/build.h -I-Y
ss Checkout $/Code/engine/build.h "-cAutobuild checkout" || error ss Checkout
ss Label \$/Code "-L$VERSION_LABEL" "-CMade by automatic engine build" || error ss Label
ss Get $/Code/engine "-GLengine/" -O- -I-Y -R -GF- -GWS "-VL$VERSION_LABEL" || error ss Get latest version
ss Checkin $/Code/engine/build.h "-cAutobuild checkin" || error ss Checkin
The exclusive checkout nature of SourceSafe does causes a few problems. You need to make sure the script undoes any checkouts if there is an error. Alternatively the script can try to undo checkouts as the first thing it does. That way it recovers from previous aborted runs.
You should make your script automatically tag your code and assets with the build or version number. When you do this make sure you are tagging the actual version that the script is using, even if somebody else changes files while the script is running.
For example, with SourceSafe you need to first tag a version. Then do "ss Get" with that label, as in the example line of code above. This guarantees you are compiling exactly the labelled version.
To use CVS from the command line, you don't need to do anything special. It comes included with the latest version of Cygwin. Partly as a code example, here is a function which ensures the user has logged in (using pserver protocol) on the build machine.
# Set HOME and CVSROOT before calling
function cvs_loggedin()
{
  # get them to log into CVS, if necessary
  if [ ! -f "$HOME/.cvspass" ]; then
    echo Please log in the first time
    cvs login
  fi
  cat "$HOME/.cvspass" | grep "$CVSROOT" >nul
  if [ $? == 1 ]; then
    echo Please log in the first time
    cvs login
  elif [ $? == 2 ]; then
    error grep
  fi
}
Tagging a version in CVS is much easier. If you check out a particular version and tag it, then the tags apply to the version that you checked out. This is in contrast to SourceSafe where the tags apply to the latest version in the repository.
It's very handy to be able to automatically make a new version of your game engine. It's often useful to do this between full builds, so level designers or artists can get working with new features.
Before compiling you need to fetch the code from source control. It's useful at this point to automatically increase the version number. The Creatures 3 game engine has a hard-coded version number. The script updated this version by editing a header file, and checking it back into source control.
According to your compiler, there will be some way of building your project from the command line. If you are using Visual C++, don't follow the obvious documentation and go messing about with exported make files and nmake. You can just call the IDE in command line mode.
msdev "engine.dsp" /MAKE "engine - Win32 Release" /OUT "build.log" || error msdev
Before you call it you need to set up some environment variables - mainly PATH, LIB and INCLUDE. You can find these in the file VCVARS32.BAT which is in the Visual C++ bin directory. Under Windows NT/2000 the Visual C++ installer can set them up for you in the global environment.
When the build has completed the script can copy the file to the network, with an appropriate name to mark its version number.
So that everyone knew what has changed in the new executable, Creatures 3 had a ChangeLog file in version control. Whenever someone made a change, they added a comment to this file saying what they have done.
The engine build process checked this file out, and posted its contents to an internal newsgroup announcing the new engine. It then cleared out the file for future use, and checked it back in. At last, agent engineers and level designers know exactly what is new!
To transfer assets from and to the network you need the full suite of file copying commands. They can seem quite slow under Cygwin, but they are fairly intuitive to use.
Here are some random examples.
mv engineSDL.exe engine.exe
mv -f *.gen old/
mv My\ Agents/* "Resource Files Directory/"
cp -R "CD Image" "//oracle/c3/Completed Builds/new build being copied"
mkdir Source\ Data/Catalogue
rm -fR Source\ Data/Bootstrap
cd $BUILD_DIR
Notice the backslash to escape spaces, as in My\ Agents. Alternatively, you can use quotes to similar effect, as in "Resource Files Directory/". If you do that you need to put any wildcard * outside the quotes, or else it will be protected as well.
The -R stands for recursive, and confirms that you want to copy or delete a whole tree. The -f in the rm (remove) command is used to suppress errors if the file isn't there. This is useful in a build script.
You can use network paths (UNC) directly, as in "//oracle/c3/".
The Unix command line is excellent at manipulating text files. They are its bread and butter. You can use text processing to update version numbers, to fiddle with InstallShield scripts and to check for errors in your game script files.
It's a bit of a black art, but well worth learning.
Quite a lot can be done within Bash. Have a read of the manual, particularly the section on "Parameter expansion". It can be more fun, and clearer, to use standard Unix command line tools.
Grep (or egrep, which is the same with a slightly more standard syntax) can be used to search for lines within a file in a powerful way. The following example finds all the lines in a file which contain the text "sndc" or "sndl" or "sndq" or "snde".
egrep -h sndc\|sndl\|sndq\|snde "$COSFILE" >> /tmp/sounds
Those are all sound commands in our scripting language. The egrep line is part of a function to verify that all sound files are present in the build.
All the funny characters form regular expressions. This is a powerful way of pattern matching. It can do whatever you want, when you work out how to. Type "man grep" to find out the basics.
Notice that there is some more escaping with \ to make sure the | (or) characters get through to grep, rather than being treated as a pipe by the shell.
This example replaces the text "My Creatures" with the Dutch "Mijn Creatures" in an InstallShield script file.
perl -pi.bak -e"s/My Creatures/Mijn Creatures/gi" InstallShield/Script\ Files/Setup.rul
Using Perl has the advantage that it can edit a file in place. Sed (short for Stream EDitor) is similar to this restricted use of Perl, but can only be used with redirections. You have to make a new file. It's useful if you're in the middle of a long pipe of other commands though.
sed <"$COSFILE" >tempcos "s/^[^*]*dbg: outv/\*&/i;s/^[^*]*dbg: outs/\*&/i"
That slightly crazy command comments out debugging lines in our internal scripting language. Any lines which begin "dbg: outs" or "dbg: outv" get replaced with "* dbg: outs" and "* dbg: outv". The asterisk is the comment character.
Notice the complex regular expressions - they make more sense when you write them than when you read them.
Also worth looking at is "diff".
diff /tmp/soundsfail /tmp/soundsok
if [ $? == 1 ]; then
	error "Sound files missing"
elif [ $? == 2 ]; then
	error diff
fi
These are very powerful tools that can be strung together to do lots of things. Since learning them I've find them very useful for analysing log files and writing one-off scripts for many purposes.
By this point your script should have gathered everything from source control and the network, carried out any processing, and have a basic game "footprint" image for testing out.
A good test to do is to copy the footprint into the Program Files directory and launch the game. You probably want to doctor the footprint a bit to put the game in a rolling demo or self test mode. In Creatures 3 we added script files to automatically load a world and hatch some Norns.
You can use Bash's job control to kill the game after 5 or 10 minutes when the test has completed.
	echo Launching Creatures 3...
	cd //c/program\ files/Creatures\ 3/
	# Note the ampersand on the next line, which launches
	# the game engine in the background.
	./engine.exe&
	ENGINE_PID=$!
	echo -n Waiting 5 minutes to see if any errors are made...
	for TIME in 5 4 3 2 1; do
		echo -n $TIME..
		sleep 1m
		if [ -f "$ERROR_FILE" ]; then
			 error Full game test failed
		fi
	done
	echo ..done

	# This uses the stored engine Process ID to terminate it
	kill -9 $ENGINE_PID
The Creatures 3 game engine always writes errors to a log file. This is to make it easier for testers and customers to report bugs or problems. It also makes it easy for the script to detect any problems.
With the ecology in the game running, and the Norns playing about for ten minutes, we could be sure that the build worked. This guaranteed that our testers got something reasonably good to play with - their time not wasted on overt errors.
At this point, Creatures 3 also used the game engine to generate a special asset for the build. The game featured a pre-generated Norn "starter family". They had to be constantly kept up to date with changes in genome and engine archive file format. As ever, the scripts took the strain.
The two parent Norns were automatically created during the self test. They were aged, taught all vocabulary, and allowed to walk round and play for a while. They were also encouraged to be friendly with each other so they would breed more easily on the players' machines. After this quick introduction to life, they were exported. The build script then copied them from the Program Files directory back to the build image.
The script does some extra checks at this stage. For example, it ensures that the female starter Norn doesn't actually get pregnant!
Numbering each build is a good idea. As you're a whiz at manipulating text files by now, this should be easy. You can keep a file on the network with the last build number, and then increment it each build.
	echo -n Incrementing build number...
	BUILD_NUMBER=`cat "$BUILD_NUMBER_FILE"`
	echo -n from $BUILD_NUMBER...
	BUILD_NUMBER=$((BUILD_NUMBER + 1))
	echo -n to $BUILD_NUMBER...
	echo $BUILD_NUMBER > "$BUILD_NUMBER_FILE"
	echo done
The number can be displayed in game, and used to generate the network directory name where you copy the finished build.
Creatures 3 used InstallShield for installation. This section of the build script doctors some of the configuration files, compiles the InstallShield scripts, and builds an installation. It then copies that and makes a CD Image on the build machine.
For the Internet-based sequel to Creatures 3, called Docking Station, we used our own custom installer. The build ran our own special compression scripts at this stage. It then uploaded the files to the internal web server for testing. With one command we can make a new build live to the general public.
It's bit fiddly calling InstallShield from the command line. You need to both Compile the scripts, and Isbuild the final image. All our file groups are set in dynamic mode in the IDE, so any new files are automatically pulled in.
PATH="//c/Program Files/InstallShield/InstallShield 5.5 Professional Edition/Program":$PATH

echo Compiling...

echo Compiling scripts...
Compile "InstallShield\Script Files\setup.rul" -i"InstallShield\Script Files;C:\Program Files\InstallShield\InstallShield 5.5 Professional Edition\Include" -v0 || error Compile

mkdir -p "CD Image/Install"

echo "Building..."

echo -n "Cab files..."
# choose sourcefile by rewriting install shield input file
echo [DYNAMIC] > "InstallShield\File Groups\Source.fgl"
echo WILDCARD0=*.* >> "InstallShield\File Groups\Source.fgl"
echo INCLUDESUBDIR=YES >> "InstallShield\File Groups\Source.fgl"
echo FOLDER="$BUILD_PATH_WINDOWS/Source Data" >> "InstallShield\File Groups\Source.fgl"
echo >> "InstallShield\File Groups\Source.fgl"
echo [General] >> "InstallShield\File Groups\Source.fgl"
echo Type=FILELIST >> "InstallShield\File Groups\Source.fgl"
echo Version=1.10.000 >> "InstallShield\File Groups\Source.fgl"
echo working...

rm -Rf "Temp"
isbuild -p"$BUILD_PATH_WINDOWS\InstallShield" -m"Default" -b"$BUILD_PATH_WINDOWS\Temp" || error isbuild

echo Copying data to CD Image...
cp -R Temp/Disk\ Images/Disk1/* "CD Image/Install/"
rm -Rf "Temp"
Notice the lines that move InstallShield's completed files from /Disk1/ to the appropriate place in our CD Image. This is a great saving - before build scripts it was a real pain to have to manually move the files.
InstallShield's compression features aren't used, so the files are uncompressed on the CD. This makes it easy for people to check what was in a particular build, and also for users to retrieve corrupt files without a complete reinstallation. Customer support loves it too - they can recommend a manual installation if a customer is having unforseen trouble with InstallShield.
Unfortunately you can't quickly patch a build by changing these uncompressed files. If the size of any file changes then you have to recompile from within InstallShield.
Your CD Image is now complete, and can be manually tested on the build machine, or installed directly from there to other machines.
The final stage is to copy the CD Image to the network. If the network was busy we found it could take twenty minutes to finish the copy. People often tried to install the image while it was incomplete.
To get round this problem of over-eager testers, Creatures 3 copies the build to a folder called "new build still being copied". When it has finished it renames it to the appropriate name, number and language. For example, "build 98 spanish".
The builds were all put in a standard "completed builds" directory on the network. This makes it very easy for people to find them.
In addition to copying the CD Image, it might be worth taking a back up of source code and scripts here as well. The completed build folder would then be a toolkit for remaking exactly the same build. Very useful for remasters, where someone wants the identical build but with minor modifications.
People like to know what is happening, and to feel in control. When the Creatures 3 build script finished its job it sent an email to a special mailing list on our mail server. This announced the new build, with a link to its location on the network.
To do this you will need a command line email program. There isn't one built into Windows, but you can find a list of some on WinFiles.com at http://winfiles.cnet.com/apps/nt/mail-command.html
If there was an error in the build then a complete log of the script's output was sent to a developer on the team. He would then chase up the problem, fix it, and set a new build going.
It would be hard to overemphasise how important error handling is. The build needs to abort as soon as there is a problem. The default behaviour of Bash is to carry on blindly if you don't put in any error checking.
Every command line program returns an error code. This is 0 for success, or a number to indicate different types of failure. For example, diff returns 0 if no differences were found, 1 if there were differences, and 2 for an error (such as file not found).
You can automatically make the script stop if any simple command returns an error by using set.
set -e
If you're using pipes a lot you need to be slightly careful with this, as an error in the pipe isn't detected. The variable $? will be set with the return code of the last command in the pipe.
Logging error messages for emailing to a developer is a little tricky. The easiest way is probably to call your whole script from another script.
The outer script can pipe all output (stdout and stderr) to both the screen and a file using "tee". When it has finished it can check the error level. If it is greater than zero then the output log can be emailed to the appropriate person.
This example outer script from Creatures 3 takes a list of languages as parameters. For each one a function "go_build" is called with the language as a parameter. The function then runs the main build script "c3build" with the appropriate build stages, including the language.
function build_error()
{
	# ...
	# code to email /tmp/build.err to developer
	# ...
}

function go_build()
{
	./c3build prepare $1 check test compile commit || build_error
}

rm -f /tmp/build.err

# run build, trapping messages
for COMMAND in $@; do
  go_build $COMMAND 2>&1 | tee /tmp/build.err
done
Whenever there is an error, the contents of the log file are immediately
emailed to the developer.
There were some problems or frustrations with the Creatures 3 build process, or the tools used.
The Cygnus tools expect a Unix format file system. This has everything mounted under one root node /, rather than having drives c:, d:. All of the tools can happily access files using paths like "//c/program files/creatures 3/engine.exe", or network paths "//cyberbackup/clabs xtra/creatures 3/". The problem comes when calling external Windows programs with absolute paths as parameters. You then need to store the path name twice.
BUILD_PATH_CYGNUS="//d/C3Build"
BUILD_PATH_WINDOWS="d:/C3Build"
The first form is to pass to a Unix tool, and the second to pass to a Windows designed program.
Because of spaces in filenames, the syntax of cp and mv and other commands can be counterintuitive. This took up more time than expected. One solution is to learn this aspect of Bash syntax carefully. On some later projects we took the simpler solution of disallowing spaces in all filenames.
Like all good tools, it does take some time to write build scripts and maintain them. It's time well spent, but it needs to be budgeted.
There are lots of ways in which build scripts could be developed and improved in the future. I'm sure you'll invent lots of things as you integrate automation into your development process.
Here are some things we learnt from the Creatures 3 build scripts, and some general ideas to get you thinking.
Optimising network copying. It's easiest when writing the script not to worry about network traffic, but copying large assets about the place is very slow and clogs up your network. Perhaps ideally the build script should run on the project file and source control server. Alternatively, you can just pay attention when writing the script, and not needlessly copy large movies off the file server and then back onto it again.
What's the best way to segment the build into sections? The Creatures 3 scripts were broken into eight sections: engine, prepare, language, check, test, compile, commit, wolf. These sections can be tested and run independently. It would be useful to further break things down, as often there are independent subsections within each section. The more modular your script is, the more useful you will find running parts of it by themselves.
It would be useful if it could automatically restart in the middle. The Creatures 3 build process doesn't have any sense of where it is up to. Sometimes you can manually restart from halfway through, but you have to know what you are doing. It would be useful if the script tracked this. That way, when an error is found, the build can be resumed as quickly and reliably as possible, without repeating complete stages.
Web interface available to the whole team. It might be useful to have a user interface displaying progress of the current build, and allowing anyone with authority to start a new build. This would make the build process a tool owned by the whole team, rather than something one individual has to control. This empowers people more, and lets the team make a build whenever they need to. It might not be worth doing, as it is often helpful to have one person co-ordinating things.
Automatic error reporting. It would be possible to categorise errors, and report them automatically to the appropriate person, by email. This works well with the web interface, and has similar advantages and disadvantages.
Ability to run multiple builds at once, or easily sequence builds. This would make it easier to prepare different localised versions.
Modular and general purpose. It might be possible to make your build scripts more general purpose, so they can be used on several projects. It's not clear that this is practical, as every project will be quite different in its requirements. Scavenging code from previous projects is often easier. One thing to do would be to separate key bits into separate scripts - for example, "compiling with InstallShield", and "getting a project from source control and compiling it with msdev". This library of scripts could then be shared between projects.
Using an automated build process was an invaluable tool during the development of Creatures 3. We cut costs and increased quality. Partly because of this, Creatures 3 was completed both on budget and on time.
You can easily integrate a build system with your existing development environment. You will learn new skills, and enjoy life more. Let no developer repeat tedious tasks by hand on a computer ever again.